Showing posts with label crochet. Show all posts

Thursday, November 11, 2010

Crochet Appliques


Figured out a way to make a crochet monkey applique.  I have been making crochet slouchy hats an I will use my appliques to embellish and add whimsy.  One of my co-workers asked me to make a monkey to attach to the hat.  I have lots of small amounts of yarn and making these small creations provides an instant gratification.


What do you get when you put a cute monkey applique on a slouchy hat worn by the cutest grandson? I'm short for words to describe how adorable he looks even if this hat is really intended for girls but I could not resist letting my grandson Taite model it.


Here's my beautiful daughter modeling one of my slouch hats.  I just really like this design because it does not mess up your hair as other tight hats or beanies do.  You can't really see it, but there is a butterfly applique on the side.


And here is Caleb...He was not too happy to wear the hat.  Still I think he looks so sweet and I like the one ear showing and the other one hidden.  Caleb is my beautiful 6 year old grand son.


Here's some cute japanese inspired kitty appliques...sure to add whimsy to one of my hats.

This cute wee owl was crocheted with white yarn.   The yellow part of the eyes is actually vinyl.
I am sharing this pattern which consists of two oval pieces.
 You will find detailed instructions to make this Wee Owl here:

Wee Owl Crochet Appliqué                                                                   
Jabberbug

Sunday, October 24, 2010

Little Butterflies


The butterfly on the doll looks larger than its real size.  The finished butterfly measures 2 inches at its widest.  They are a breeze to make and take so little time.  The doll is modeling my latest beret/slouchy hat creation.  I hope in the near future to have a real little girl model this hat.


I am very happy with the slouch hat and will definitely wear them once the weather gets cooler.  I really like the fact that the fit of this hat is loose so it does not mat down your hair.  That can be a problem with wearing some tight fitting hats.  I think slouchy hats look good on everyone, don't you think?
 I made a video demonstrating how to make a little butterfly.  Try it.  Your butterflies will make you smile.


 The pattern can be found here:


Jabberbug

Saturday, September 04, 2010

Bethany a Crochet Ballerina Doll


This is Bethany and she is my first crochet ballerina doll.  She was lots of fun to make.  The most challenging part was sandwiching the pipe cleaners for the legs and arms.  The pipe cleaners allow Bethany to pose as a ballerina.  She is so cute.  I made Bethany from a pattern I found on the Dolly Donations Facebook Page.  Dolly Donations also has a blog with  information about their mission of providing dolls for children in need.  This site also provides the patterns and tutorials for making the sewn dolls.  Since I crochet and knit I thought I would start with Bethany.  I have downloaded the pattern for the sewn dolls which look very simple and easy to make. 
Dolly's long and slender ballerina legs.
Dolly's pretty face.  I just made french knots for the eyes and sewed eyelashes using DMC floss.
The mouth was also made using DMC floss.
Dolly's yarn hair.
Dolly was made using Vanna's worsted weight yarn.
Since Bethany is on the small side, she would be perfect to include in the Operations Christmas Child boxes.  Now, I'm starting to get a little anxious....Will I be able to complete all these projects....????keeping in mind that I have a 40 hour job.  So many neat projects to make...and so little time.
I know my friend Larissa has made the sewn dolls so I'm sure she'll be able to tell me approximately how long the sewn dolls take to make.  I'm tired...so this is it.  Good night.  Just now heading to read Larissa's latest post about doll making.


Jabberbug

Saturday, August 14, 2010

Amigurumi - Crocheted Stuffed Toys


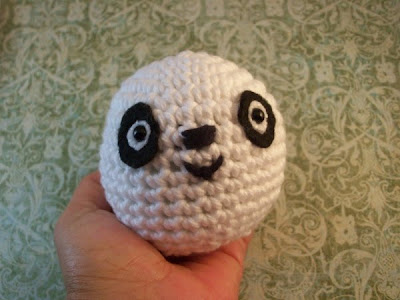
Amigurumis have oversize heads and small bodies and extremities.  This is the Panda I have been working on for Jessica.  The end result is almost always cute.  Wikepedia defines Amigurumi as a Knitted Stuffed toy but I think it should be Crocheted Stuffed Toy.


Perfect round Oversize Head

To make a perfect round head follow this pattern:

The number in the ( ) represents the number of stitches once the round is worked.

Round 1: Chain 2, make 6 single crochet in the second chain from the hook. (6 single crochet)
Round 2: Work 2 single crochet in each single crochet in each single crochet. (12 single crochet)
Round 3: *Work 1 single crochet, 2 single crochet in the next  single crochet. Repeat from * to the end (18 single crochet)
Round 4: *Work 2 single crochet, 2 single crochet in the next single crochet. Repeat from * to the end (24 single crochet)
Round 5: *Work 3 single crochet, 2 single crochet in the next single crochet. Repeat from * to the end (30 single crochet)
Round 6 to Round 13 - Work even - One single crochet in each single crochet (30 single crochet)
The following is a decreasing row:
Round 14: *Work 3 single crochet, 1 single crochet decrease. Repeat from * to the end (24 single crochet)

Attach the eyes at this point.
Make another decrease row:
Round 15: *Work 2 single crochet, 1 single crochet decrease. Repeat from * to the end. (18 single crochet)
Round 16: *Work 1 single crochet, 1 single crochet decrease. Repeat from * to the end. (12 single crochet)

At this point you may begin stuffing the head using polyester fiberfill.

This is the last decrease:
Round 17: *Skip 1 single crochet, work 1 single crochet.  Repeat from * to the end (6 single crochet)

Cut the yarn and leave a 4 inch tail to close up the small hole. Fasten off pull on tail and weave in tail inside


 Part 1 of this video shows how to start making the head.


Part 2 of this video shows how to begin the decreases that will shape the amigurumi head.


I'm finished and I  hope Jessica likes me.


Jabberbug

Thursday, May 27, 2010

Tags from Recycled Cards

I found some cards and decided to re purpose them by making tags. To make the tags special I added a crochet border.
 To make these tags, you will need a pretty card cut in tag size: 3" by 4"  or 3-1/2" by 4-1/2".  You will also need an awl or a sharp needle to make the holes on the bottom edge of the tag.  To make the crochet border, I used a size C (2.5mm) crochet hook.
 Sport Weight yarn.  I used Patons Grace.
 Cut the card in tag shape.  To cover the back side of the tag I used scrap book paper. Use a glue stick to glue two pieces together.
Using the awl and graph paper as a guide puncture the bottom edge of the tag.  I worked on a mouse pad surface to protect my table. 
You may go over each hole to enlarge them  a bit so the needle will go through easier.
 Cut a piece of yarn at least 5 times the width of the tag.  Thread a wide eye needle (such as a Tapestry needle) and use the blanket stitch to create an edge.  This is the base and you will use it to make  the crochet stitches.
With the front of the tag facing you (this is the right side), insert the crochet hook and begin the crochet border.
Here are some more samples:  This mini tag came with a bag I bought at Target.  You may cover the tote bag words and add your own words....such as Hi....or What's Up?  Use your imagination.  Affix this mini tag to a card.
as I did in this example:
Christmas card turned into a tag.
Can you tell I like snowmen? I chose to hide the blanket stitch on the snowmen tags.  The blanket stitch and crochet border were done on a separate tag and covered with the snowman card pictures. Simply glue the two layers together.
More samples....
I will make a short video showing how to make the blanket stitch on the card stock soon.
I have written three patterns which are very simple to follow:
Crochet Border Tags


Jabberbug

Monday, April 19, 2010

Book Worm Book Mark

This is a great crochet project that will allow you to use those small balls of left over yarn.  It's also quick and easy. This cute worm book mark will also save your page number.  I read the Tailypo, a Ghost Story some time ago when Caleb came to visit.

 I used worsted weight yarn and a size H crochet hook.

Chain 50, work 4 dc in the third chain from the hook.  Your work should look like this after making the 50 chains:


and like this after completing the four double crochets:


On the next chain work 3 single crochets through the top loop of the chain.  Repeat this stitch until the unworked chain measures approximately 8 inches.  Slip a stitch and fasten off.  Weave any yarn tails that remain.  This long tail keeps the page number and the worm will remain outside the book.

This pictures illustrates the hook going under the top of the loop before you make the three single crochets.
 To slip the last stitch, make sure you go under two loops and then slip the stitch.

For the eyes, I used plastic safety eyes.  You can buy the kind you glue at Michaels or you can simply make the eyes by making two french knots with black DMC floss.
 Crochet Bookworm                                                                   

Jabberbug

Saturday, March 27, 2010

A Motif a Day

I never go out of town without a project to crochet or knit.  This book became my companion and I was pleasantly surprised how I was able to follow the patterns I worked on.  I guess I can consider myself and Intermediate crocheter if I was able to work these patterns. It can be very frustrating when you can't follow or understand patterns. This book is not too complicated and the stitch diagrams which accompany every motif are also helpful.

A year or so ago I would not have been able to crochet anything in this book. I think.
I'm so glad I don't get sick while crocheting in the car. It sure helps pass the time on the 4-1/2 hour car ride.
The Fanning Points Motif
La Fleur de Vie
Sunflower
Ice Crystal
So now that I have succeeded I want to make more.  I will hold on to these samples and give them as gifts.  These were worked using mercerized cotton and could be used as doilies.  This book would make a great addition to my library.  I would highly recommend it for anyone who likes instant gratification.  All these motifs are very quick to complete.


Jabberbug

Tuesday, March 02, 2010

Eco Friendly Cotton Nylon Scrubby


In the quest for using left over yarn I designed what I'm calling the Eco Friendly Cotton Nylon Scrubby.  The nylon scrubbies had been under my sink.  I purchased this at the Dollar General, at least six come in the package. 
The cotton cozy together with the nylon scrubby create the eco friendly sponge.  Reusable and good for the environment.
Insert the nylon scrubby into the cotton cozy and use the crochet hook to sew together using slip stitches.
The eco friendly has been tested and tried on dishes, glasses and pans.  

The pattern is published here.

Jabberbug