Showing posts with label paper. Show all posts

Sunday, May 15, 2011

Paper Bunting Card


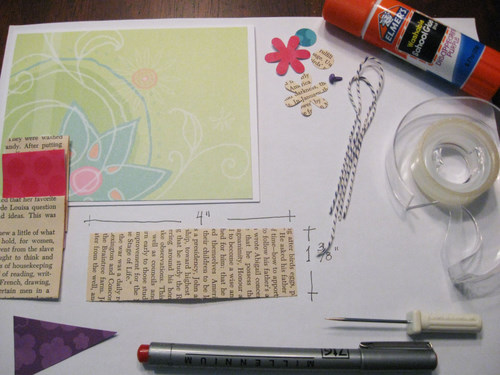
To make this very easy card, you will need scrap booking paper, paper from a discarded book, white cardstock (for the card), glue stick, an awl, a marker with a fine tip, double stick tape, a punch to cut the little flower, a small circle punch to cut the two circles for the flowers and twine.


From white card stock cut a piece that measures 5-1/2" by 8-1/2".  Fold in half.  Cut another piece from scrapbook paper which measures 4" by 5-1/2".  Use small pieces of double stick tape and center scrapbook paper piece on top of the white card.  The pennant shape pieces are made from a piece of scrapbook paper and from pages from an old discarded book.  Cut this pieces t o measure 4" by 1-3/8".  Fold each piece in half using the glue stick to hold in half.  Using scissors  cut into a pennant shape.  Place the four pieces and secure to the card using the glue stick. 
Using an awl puncture two small holes right next to the pennant shapes.  Do this on each side.
Using a blunt needle thread a piece of twine and tie into a bow.
Embellish the card with flowers cut with a punch and using a fine tip marker write the sentiment.
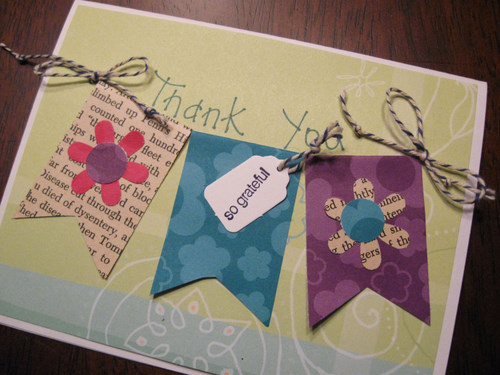
The Finished Card
 
Some more cards using the same materials and technique:


Jabberbug

Friday, April 22, 2011

Earth Day Crafting


I checked out this book and found a neat book  to make using the subscription inserts that come in magazines. So this is why I'm calling the post Earth Day Crafting since I am repurposing.  The instructions for the Custom Bound Books is on page 64. You can really use any size or type of paper you have on hand.


 You will need 10 pieces of paper.  Three pieces will be for the pages of the book, Four pieces will work as connectors, two pieces for  the title pages and one piece will be used to create the books spine.
 Step 1 {Make the pages for the book}
Fold one short end to the middle not creasing the middle section
Do this on the other short side.   Fold three pieces in this manner. Your paper now looks like this:
 Now fold the short sides again to the middle.
 Step 2 {Make  the Connectors}
Fold in the same way as for the pages but fold one of the sides overlapping the other side by 1/8 of an inch.  The connectors will be 1/8" smaller.
Step 3 {Make the covers}  You will need two pieces of paper and these pieces are folded the same way you folded the pages.
Step 4 {Make the Spine}  You will need one piece of paper to make the spine.  Fold this piece the same way you folded the connectors.  Arrange your pieces of paper in order before joining them.
Step 5 - Join the pages to the connectors by slipping the connector into the page making sure all the open edges are all on the same side.  Join in this manner:
1 connector, 1 page, 1 connector, 1 page, 1 connector, 1 page ending with 1 connector.
Now join a cover to each side.
Step 6 {Fold the book in accordion style}
The opposite side of the accordion looks like this:
The pages of the book
Step 7 {Use the last piece of paper to make the spine by......
Slipping into the two covers.   I applied a small amount of glue to the spine piece facing you.
The finished book.
This little book is perfect for jotting down Memory verses.

I also made a birthday card booklet using this technique.  I used 8-1/2 by 11 inches paper.  Keep in mind that the connectors will not be seen so you can use paper that has some writing.  You can even pre print your pieces of paper to make a mini scrapbook.  This I am going to try next.  The pretty illustrations on this birthday card booklet are from the Graphics Fairy.  For a more finished spine, you can cut a piece of paper and glue to the spine. I used a piece of magazine paper to make the spine strip.
'Till we meet again....


Jabberbug

Saturday, March 05, 2011

Origami Newspaper Pots

The weather is changing rapidly and has been consistently mild causing all kinds of beautiful blooms.  I do hope this continues and we don't get any freezing temperatures.  It still could happen, time will tell.  We have gotten snow in Charlotte in April.  So I thought I would get a head start and plant seeds indoors hence the Origami Paper Pots.  All you need is newspaper and a desire to fold....trust me it is therapeutic.  It does take time but you will be so proud you did not just recycle your newspaper but repurposed it.  I used a small newspaper.  If you use the large size you will get two squares from each sheet. After cutting the paper, you will need to square the sheet.  Just fold in a diagonal to cut into the square shape.  The piece should measure a little over 10 inches square.
 Fold paper diagonally on both directions to mark the center.  Fold each corner so the points meet the center.
 Fold each corner once again in the same way.
Fold up and divide into thirds. (Eyeball the folds) If you want you can use a ruler to make sure the measurements are about the same. Do this folding in both directions.
Once folded into thirds your square should look like this.  Don't forget to repeat the process in the other direction.

After folding in this manner in both direction notice you have a grid. The base of the pot will be approximately 2 to 2-1/2 inches.
This is the tricky part but don't give up.  You will be folding up the sides to create a box.
This is how it should look once you fold up.  Now bring the top and fold it down so it is now inside the box.
After you fold down the side tuck the point inside the box.
The finished box should measure approximately 2 to 2-/12 inches square.  


Fill the paper pots with loose soil and place in a pan.  I used a rectangular cake pan.


Place around 3 to 4 seeds and cover with about 1 teaspoon of soil. Water and keep moist.  I made a  tent using the plastic wrap in which rolls of paper towel came.  Keep the wrapping loose to simulate a  greenhouse.


I planted Cornflower seeds and they sprung fast.  This is how the seeds looked two days  after planting.


A week later the seedlings look happy although thin.  Keep in a well lit location and water using a spray bottle.  I squirt them when I see the top of the soil looks dry.  You will do this at least 4 times a week.
I will be planting these outside soon.  There is no need to take them out of the paper pots.  Plant them directly into the ground.  The paper will disintegrate.

Jabberbug

Sunday, February 14, 2010

A Year or so Ago

A year or so ago  I got this cute Valentine from my two grand kids.  I've kept it all year long in my kitchen to remind me how blessed I am. Sure would be nice if they lived a little closer.  Next year at this time there will be another little boy in the pictures my daughter takes.

This is my valentine card to Cliff this year which he has not seen as I write this.  He has been gone all day.  He left for work around 11:30 pm and he has not returned.  He did say it could take long but I'm getting ready to call him soon.  Just being lazy getting my cell phone from the car. The card illustrations are from Blissful Elements. I just love vintage and paper ephemera. The paper background was also a gift from Connie.  Making cards is therapeutic and a great outlet for expressing creativity.
The inside of the card. The picture is a few years old.
Worked some on Hedgie and thanks to Connie I'll be able to complete it.  Fun Fur yarn is becoming rare and I was not able to get any but she insisted I use some of her Sirdar Foxy and in the squirrel colorway.  Love how it's coming out.
Hedgie's body...
After church I stopped by The Fresh Market and my mission was to get some of their Pillow cookies for my valentine.  These are absolutely my favorite cookies.  Marion at work first introduced me to them. While at the Fresh Market I also picked some All Dente enriched noodles Lemon Chive Fettuccine.


Happy Valentines to all my Loved ones and friends.
Cliff update: He just now called and is on his way.


Jabberbug