Showing posts with label hand made cards. Show all posts

Sunday, May 15, 2011

Paper Bunting Card


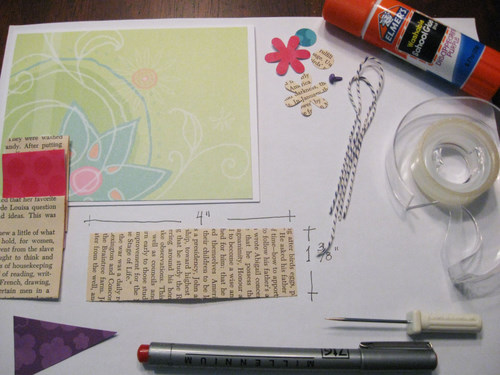
To make this very easy card, you will need scrap booking paper, paper from a discarded book, white cardstock (for the card), glue stick, an awl, a marker with a fine tip, double stick tape, a punch to cut the little flower, a small circle punch to cut the two circles for the flowers and twine.


From white card stock cut a piece that measures 5-1/2" by 8-1/2".  Fold in half.  Cut another piece from scrapbook paper which measures 4" by 5-1/2".  Use small pieces of double stick tape and center scrapbook paper piece on top of the white card.  The pennant shape pieces are made from a piece of scrapbook paper and from pages from an old discarded book.  Cut this pieces t o measure 4" by 1-3/8".  Fold each piece in half using the glue stick to hold in half.  Using scissors  cut into a pennant shape.  Place the four pieces and secure to the card using the glue stick. 
Using an awl puncture two small holes right next to the pennant shapes.  Do this on each side.
Using a blunt needle thread a piece of twine and tie into a bow.
Embellish the card with flowers cut with a punch and using a fine tip marker write the sentiment.
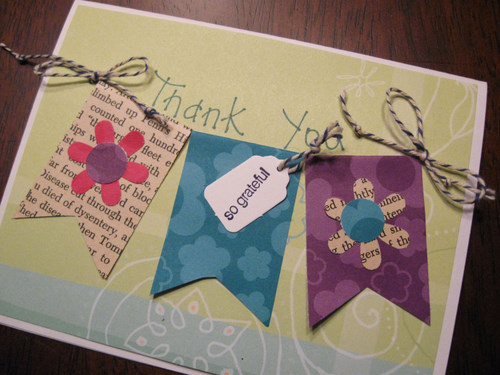
The Finished Card
 
Some more cards using the same materials and technique:


Jabberbug

Tuesday, January 11, 2011

Snow Day Crafting


A coworker shared with me a neat way to recycle Christmas cards.  You can also use pretty scrap book card stock.  This craft works better with cards that are not too thick.  This makes the folding easier. The snow scene book mark was made using a Christmas card.  The other two were made with scrap book paper.

It's all about being green and frugal.


Surprise a friend who likes to read by giving them one of these.

Thank You Marilyn!


The instructions on how to make these is here.


Jabberbug

Sunday, November 28, 2010

Busy Time of the Year for Me

Being crafty is rewarding but at the same time exhausting with all that goes on at this time of the year. There are cards and gifts to make, orders to fill, cooking and baking to be done for events, programs at the Library to plan, etc...etc...

I try my best to keep things simple and quick. I found some very inexpensive cards during my shopping trip to AC Moore.  I could not resist especially since I had already used all of my hand made cards.  The quality of the studio g cards was not really very good since the paper what I would call thin card stock.  With the 25% discount these 8 blank cards cost under a $1.00.   I was determined to make something pretty and I was not disappointed.  Just wish the card stock would have been a little thicker.


I found everything I need for this card at home. 


This is the easiest bow you'll ever make.  Just knot and trim to the desired size.
The water color was done with Stampin' Up markers and the water color brush. I stamped the angel on the inside of the card.
To add some color to this plain white card, I simply added a border made from scrapbook paper.  I did cut off 1/2 an inch to the front of the card and used a glue stick to glue the border.

 The next cards were made at a friend's house....They took much longer to make.


It's beginning to feel....like Christmas.


Jabberbug

Tuesday, April 27, 2010

Fun with Scrapbooking Paper and Magazines

I have found a use for all those magazines that have beautiful pictures such as Southern Living and Country Living.  Before you decide to recycle them...go through the pages and cut out pages with flowers, gardening pictures, text etc....I made two cards that were fun and easy to make.

This is card #1
Make the base card by folding a piece of card stock which measures 5-1/2" by 8-1/2". I used Kraft color card stock from Stampin' Up.  You will also need a button for the center of the paper flowers.

 
 For this card I wrote a message around the perimeter of the larger one using a fine tip permanent marker. "Wishing you a Happy Birthday...may all your dreams come  true. It's your day.


Cut out circles in three or four different diameters approximately (3-1/2, 2-1/2 and 1-1/2 inches)  If you don't have a circle cutter, you can just find circular objects around your house (glasses, jars, etc...) to trace the circles.  The measurements don't have to exact...just cut the circles in different increments.   The magazine paper is easy to tear so for I tore the circles after I  traced them.  Next crumple up all the circles.
Line up the circles and sew the button in the middle.  Insert the needle from the top and finish with a knot.

 Cut a larger image from the magazine to use as the background.  I used a punch to make scallops on the lower edge of the paper.
 
 Position the leaves to the right.  Place the circles on top of the leaves.  You are done.
 To make card # 2, I used scrapbooking paper to cut the circles and leaves.  This paper is much thicker so you will need to spray the paper (back and front) with water before crumpling.  Let air dry.  I used a button brad to secure the three layers of card stock.
 
 Supplies needed for this card.  I also used Stampin' Up Kraft card stock for the card cut in the same dimensions for the first card. If you don't have a punch to cut the scallop strip, you can use scissors that cut decorative edges or even tear one side of the strip in the same way you did the circles in card #1.
Happy Crafting 


Jabberbug

Sunday, February 14, 2010

A Year or so Ago

A year or so ago  I got this cute Valentine from my two grand kids.  I've kept it all year long in my kitchen to remind me how blessed I am. Sure would be nice if they lived a little closer.  Next year at this time there will be another little boy in the pictures my daughter takes.

This is my valentine card to Cliff this year which he has not seen as I write this.  He has been gone all day.  He left for work around 11:30 pm and he has not returned.  He did say it could take long but I'm getting ready to call him soon.  Just being lazy getting my cell phone from the car. The card illustrations are from Blissful Elements. I just love vintage and paper ephemera. The paper background was also a gift from Connie.  Making cards is therapeutic and a great outlet for expressing creativity.
The inside of the card. The picture is a few years old.
Worked some on Hedgie and thanks to Connie I'll be able to complete it.  Fun Fur yarn is becoming rare and I was not able to get any but she insisted I use some of her Sirdar Foxy and in the squirrel colorway.  Love how it's coming out.
Hedgie's body...
After church I stopped by The Fresh Market and my mission was to get some of their Pillow cookies for my valentine.  These are absolutely my favorite cookies.  Marion at work first introduced me to them. While at the Fresh Market I also picked some All Dente enriched noodles Lemon Chive Fettuccine.


Happy Valentines to all my Loved ones and friends.
Cliff update: He just now called and is on his way.


Jabberbug

Sunday, February 07, 2010

My New Wristlet and Camera Pouch

My wristlet and small zippered pouch from JPat Purses arrived this week.  I fell in love with the fabric as soon as I saw these on her shop not to mention they were on sale. They are both padded lined.
The small one is perfect for my camera.

The ruffled wristlet perfect for taking to my knitting group or going out to lunch from work.
Fully Lined and just too cute.
To make the following card, you will need to cut two card stock pieces in the following dimensions.  The card itself, 4" by 11" (pink).  Score at 2" and 7-1/4".  Scoring makes it easier to fold the card stock.  The brown piece measures 4-1/4" by 5-1/4".  I cut the piece with the cute owl to measure 2-1/4" by 3-1/4". To back this piece cut another piece of card stock measuring 2-1/2" by 3-1/2"
Don't get confused now.  This completed card was made in brown with the small backing piece in pink.
Use double stick tape or glue stick to hold owl piece with the pink backing.  Secure this piece to the card also using double stick tape or a glue stick.  Turn the folded card over and use more double stick tape or glue to secure the backing piece (in this case the pink piece) to the card. To make the bow take a small length of 1/2" ribbon and tie in a knot. Secure to card with a glue dot.  This card will need to be put under heavy books as it wants to stay opened.
These were made with white card stock and black card stock was used for the card backing.


Jabberbug

Wednesday, January 03, 2007

My Last Day of Vacation


I'm going back to work tomorrow - Sure has been nice to be off for a few days. I did not accomplish everything I wanted to do on this last day. My Christmas tree is still up, the christmas lights are still on the front porch. Oh well; maybe all that stuff will be put away this weekend.

I did finish my Thank You cards for my co-workers. Everyone at work was so generous this Christmas. I took time this evening, made myself some green tea I prefer my green tea with ginseng and lemon. I read in an article about the benefits of green tea that it is even good to prevent tooth decay. It's flavor sort of grows on you. In the beginning you might not like it; but then you will find yourself making some more. I like the fact that it can help counter or help slow the aging process being a source of antioxidants.

Picture of the garden elf.

Thoughtful gifts from coworkers.